因为准备帮人搭建个wordpress网站,想到docker更便捷且有相对隔离的环境,果断决定使用docker来快速部署。
既然使用docker部署,前提自然得有docker环境,此篇基于Linux centOS 7.5+ 环境部署,需要的安装的有:wordpress(必须),mariadb/mysql(可选),nginx(可选):
按照操作的简易程度和目的,分为仅搭建wordpress,或是wordpress站点在docker环境下启用SSL证书,也就是HTTPS访问。
wordpress版本和对应的php版本关系:
| WP版本↓PHP版本→ | 5.6 | 7.0 | 7.1 | 7.2 | 7.3 | 7.4 | 8.0 | 8.1 | 8.2 |
| 6.2 | √ | √ | √ | √ | √ | √ | √ | √ | √ |
| 6.1 | √ | √ | √ | √ | √ | √ | √ | √ | √ |
| 6.0 | √ | √ | √ | √ | √ | √ | √ | √ | × |
| 5.9 | √ | √ | √ | √ | √ | √ | √ | √ | × |
| 5.8 | √ | √ | √ | √ | √ | √ | √ | × | × |
| 5.7 | √ | √ | √ | √ | √ | √ | √ | × | × |
| 5.6 | √ | √ | √ | √ | √ | √ | √ | × | × |
| 5.5 | √ | √ | √ | √ | √ | √ | × | × | × |
docker快速部署wordpress准备工作
1.预装docker环境:
如果没有安装docker,也简单,两行搞定:
yum install -y dockersystemctl start docker分别是安装,启动docker (linux centos 7+环境)
2.拉取wordpress镜像:
拉取镜像,先拉取wordpress镜像
docker pull wordpress //如要指定版本如5.6 ,换为: docker pullwordpress:5.6
此操作拉取了最新版本,如果要指定版本,在wordpress后:版本号 即可,如: docker pull wordpress:5.6
当前官网推荐配置:
.webp)
3.拉取mariadb镜像,如没有数据库或链接配置,则需安装:
通常小站的wp数据库都同时在本机进行部署,即如果没有数据库环境,则需要在当前环境下安装数据库,或者采用连接远程数据库的方式。
使用docker安装mysql或是mariadb均可,建议安装mariadb,和5.7版mysql比,内存占用少,开销少了花费少。
docker run --name mariadb10.3 --restart=always -p 3307:3306 -e MYSQL_ROOT_PASSWORD='yourpassword' -v /home/mysql/data:/var/lib/mysql -d mariadb:10.3 --lower_case_table_names=1y
以上完成mariadb10.3的安装和运行,修改MYSQL_ROOT_PASSWORD为自己密码即可,数据库挂载在宿主机/home/mysql/data下,同时暴露了外网端口为3307,当然出于安全也可以不开放外部访问端口,直接用 -p 3306即可。
此时 docker ps 应该可以看到有IMAGE 下面有mariadb:10.3 的容器在运行中:
.webp)
进入mariadb创建对应wordpress的数据库名称:
docker exec -it  bd(容器ID) /bin/bash
mysql -uroot -p yourpassword;此数据库名  root ,yourpassword 在之后wordpress初始化要使用
use mysql;
create database mywp(数据库名称); //mywp 即为起的数据库名,可随意修改
show databases; //会看到刚才自己定义的数据库名;此数据库名在之后wordpress初始化要使用
exit; //退出
docker inspect bd(容器ID)|grep IPAddress   //获取的ip在之后wordpress初始化要使用。
3.拉取Nginx镜像,不是必须的:
如果一个服务器需要部署多个wordpress站点时,由于服务器的IP只有一个80端口用于绑定域名,所以此时需要时候Nginx实现代理访问。如果只部署单个站点则可不使用nginx。
docker安装wordpress
安装和操作LAMP相比简单太多,一行命令:
docker run --restart=always --name Mywordpress -p 80:80 -d wordpress解释下:–name 后面 Mywordpress 是自定义的名称
-p 是端口映射,表示公网80端口映射至容器80端口,如果服务器没使用nginx,做为简单的配置或测试,可以直接用80端口,如果用了nginx做反代,可调整端口配置。
-d 后台运行 。后面的wordpress,则是之前拉取的镜像名 ,这里指默认拉取了最新版的,如果指定了拉取版本,那么此时运行也需要加上版本: wordpress:5.6
--restart=always 容器退出时,docker会总是自动重启这个容器
这里使用的参数简单,当然启动参数还可以扩充。
比如 --link mysqlXXX:mysql 表示数据库连接参数。
操作完成,查看是否运行 使用docker -p。
如果列表有包含Mywordpress 的项目,则表明运行成功。
接着浏览器试试
http://172.x.x.x (对应的ip地址)
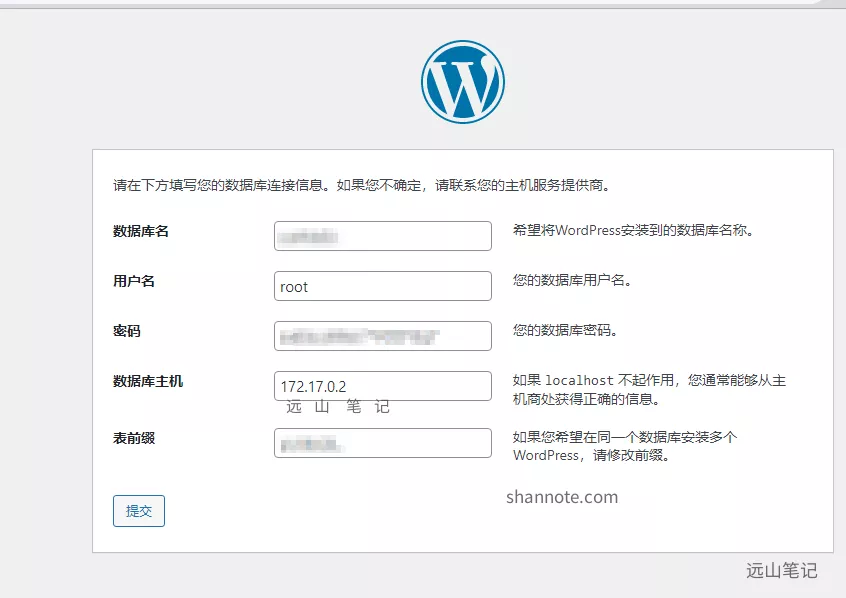
进入wordoress安装界面,到此安装完成,下一步进入wp的安装配置页。
顺便提一句,如果此处使用了docker安装的mysql/mariadb数据库,那么数据库主机地址ip可用mariadb对应的docker容器ip如我这里172.17.0.2,如果是连接了外部库或者开放了mariadb公网ip,那么数据库主机也可以使用公网ip
之前有遇到过,如果在浏览器不能的打开 wordpress的起始安装页,那就 dockers logs MywordpressId 看看日志:
AH00558: apache2: Could not reliably determine the server’s fully qualified domain name, using 172.17.0.x. Set the ‘ServerName’ directive globally to suppress this messageapache 报错了
172.17.0.x 无疑是wp的容器ip了
在apache的默认配置文件内放开 ServerName IP 注释即可
具体的文件路径是:
/etc/apache2/sites-enabled/000-default.conf因为容器没有修改命令,可安装,也可以
先把容器文件复制到宿主机
在宿主机修改此文件
在将文件复制到容器
比如我这wordpress的容器ID是 69123456789
docker cp -L 69:/etc/apache2/sites-enabled/000-default.conf /home/修改的内容是:
放开 ServerName ,并修改后面的ip为容器ip
即
ServerName 172.17.0.x
完整文件内容:
# The ServerName directive sets the request scheme, hostname and port that# the server uses to identify itself. This is used when creating# redirection URLs. In the context of virtual hosts, the ServerName# specifies what hostname must appear in the request's Host: header to# match this virtual host. For the default virtual host (this file) this# value is not decisive as it is used as a last resort host regardless.# However, you must set it for any further virtual host explicitly.ServerName 172.17.0.x #SeverAdmin webmaster@localhostDocumentRoot /var/www/html# Available loglevels: trace8, ..., trace1, debug, info, notice, warn,# error, crit, alert, emerg.# It is also possible to configure the loglevel for particular# modules, e.g.#LogLevel info ssl:warnErrorLog ${APACHE_LOG_DIR}/error.logCustomLog ${APACHE_LOG_DIR}/access.log combined# For most configuration files from conf-available/, which are# enabled or disabled at a global level, it is possible to# include a line for only one particular virtual host. For example the# following line enables the CGI configuration for this host only# after it has been globally disabled with "a2disconf".#Include conf-available/serve-cgi-bin.conf 修改后还原至容器内:
docker cp /home/000-default.conf 69:/etc/apache2/sites-enabled/000-default.conf 此时,再重启wordpress 容器:
docker restart CONTAINER_ID查看运行日志,发现有报错:
Invalid command 'SeverAdmin', perhaps misspelled or defined by a module not included in the server configuration注释掉 上面文件中 SeverAdmin 内容
再次重启 OK,进入wordpress 安装页面。
不得不说,php的运行占用内存和java比,是真的少。启动时只有53M,下面的java项目启动都得400M内存占用。
CONTAINER ID NAME CPU % MEM USAGE / LIMIT MEM % NET I/O BLOCK I/O 69********** Mywordpress 0.01% 59.81MiB / 1.795GiB 3.25% 1.07MB / 516kB 4.87MB / 758kB ************ myxx 0.29% 458.5MiB / 1.795GiB 24.94% 633MB / 317MB 50.2MB / 20.5kB ************ mariadb 0.11% 121.5MiB / 1.795GiB 6.61% 233MB / 1.34GB 100MB / 407MB
刷新